CUSTOMER NOTICE: From the 2nd of February, the office will be closed on Mondays and Tuesdays. All orders will ship Wednesday to Friday. Phones, and email, will also only operate on these days. If you need to contact us about an order, or anything else, you can use our WhatsApp number: 07985497351
Additional Information
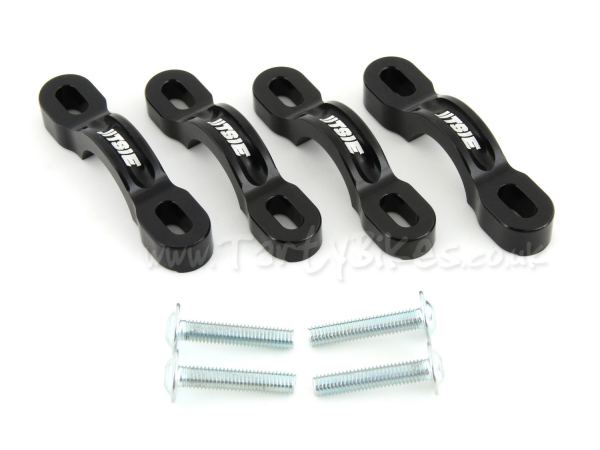
Please note: All RD parts feature surface imperfections, and discolouration on the edges of one side of the part. This is a by-product of the laser cut process, and in no way affects fit or function. Each part is QC checked by us to make sure tolerances are correct for its designed function. The small well on RD parts, visible as a small 'U' shaped cut in one of the edges of the part, is the start / stop point of the laser. We purposely designed this feature on all RD parts to ensure a clean start and finish during the laser cutting process. Tarty Bikes logos are laser etched in, and will vary in definition and finish depending on the part.
Once you've followed the steps, how do you put the chain back on?
We have the Comas 20", there are snail cams on it.<br /><Br />
Is it possible to fit in from the side after the wheel is installed, and the snail cams are maxing out the chain tension?
Posted by brian
Reply from TartyBikes
Hi Brian
If you're using snail cams, the correct way to use the blockers with this set up is as follows:
1 - Set the chain tension normally with the cams on both sides, and measure the gap on the none drive side from the end of the axle to the inside edge of the drop out, to determine the size of blocker you need, as described in the installation video.
2 - Fit the blocker to non drive side drop out, and remove the cam. Be sure to use a 3mm spacer in place of the removed cam.
3 - Install the wheel, and use the drive side cam to set the tension, and centre the wheel.
It's best practice to always use blockers on the non drive side if you're using cams, or a sprung tensioner, as it will make it easier to remove and fit the wheel.
The first comp bike I had, had horizontal dropouts with snail cams and with the 6mm bolt in hubs I was having constant issues with the wheel moving as I'm not exactly slender. I wish these were around then, as I would have had none of those issues. I've used these in combination with the RD tensioner, and the wheel never moved and the chain tension remained constant. Highly recommend.
WORKS!
Posted by Gary
I have bought a set of these for my Onza pro as I've had constant issues with chain tugs breaking, and the axle pulling forward in the stupid horizontal dropouts.
They have worked perfectly with the RD tensioner. Such a simple but brilliant design...
I would recommend these to anyone having these issues.
Reply from TartyBikes
HI Gary
Thanks for the great review! It's good to hear the blockers are working well out there in the wild on customer bikes with our RD Tensioner.
Ben
This site uses cookies in order to provide our customers with the best possible shopping experience. You can choose to accept all cookies or customise your cookie preferences below. For further information please read our cookie policy


 In stock


 Technical Info
 Facebook
 Need some help?


Once you've followed the steps, how do you put the chain back on? We have the Comas 20", there are snail cams on it.<br /><Br /> Is it possible to fit in from the side after the wheel is installed, and the snail cams are maxing out the chain tension?
Posted by brian
Reply from TartyBikes
Hi Brian
If you're using snail cams, the correct way to use the blockers with this set up is as follows:
1 - Set the chain tension normally with the cams on both sides, and measure the gap on the none drive side from the end of the axle to the inside edge of the drop out, to determine the size of blocker you need, as described in the installation video.
2 - Fit the blocker to non drive side drop out, and remove the cam. Be sure to use a 3mm spacer in place of the removed cam.
3 - Install the wheel, and use the drive side cam to set the tension, and centre the wheel.
It's best practice to always use blockers on the non drive side if you're using cams, or a sprung tensioner, as it will make it easier to remove and fit the wheel.
Ben